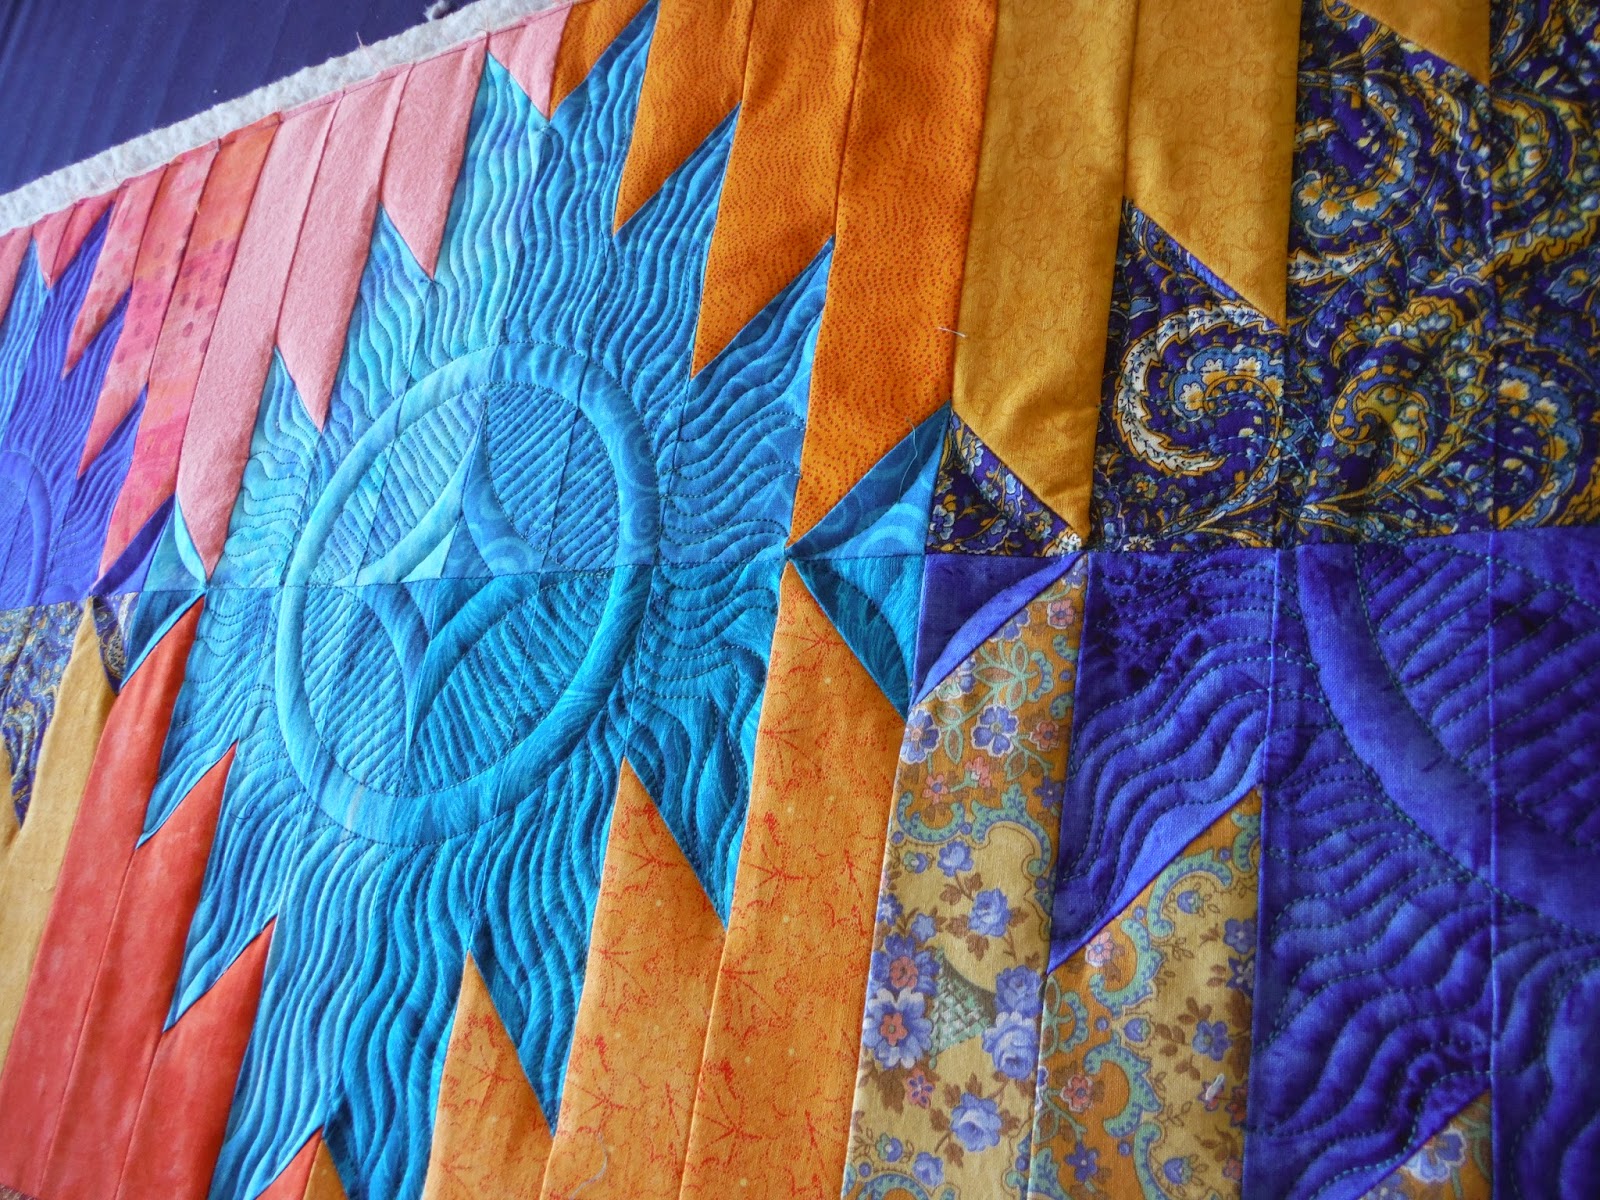
It is always very rewarding when a vision comes together. I had an idea for the quilting on my Mountain Majesty quilt and started drawing last night. I just did not seem right. Then I went to Pinterest and again nothing really jelled. Humm I had thought a spiral in the center and that is round so how about I pull out my circle templates and see how that would work...............Yep! The circles seemed to work great and once I got going the ideas started to flow and now I really love they way the blue areas have come together. The plan is to finish all the blue parts and then come back to the orange. I could do the orange the same as the blue but that might be too much of a good thing so I will mull it over while I am working my way thru the blue. In the meantime this is a fun pattern to quilt out. If you are reading this let me know what you think?
I just love my set of circles. I have a whole stack of these from 1 inch up to 12 inches, many in half inch increments.
Tuesday, September 9, 2014
Monday, September 8, 2014
Next Quilt On Longarm
I finally got myself going on the backing for the Mountain Majesty quilt and did a pieced backing. This is going to be a wall quilt but I wanted something kinda special for the back. I had an one block extra form the top and made two additional blocks so I could have a row across the back. Now to get it loaded onto the longarm and begin the most fun part of the process which is the quilting.
I also finished my last 30 blocks for the new project and will now figure out how to put them together. This was mostly a stash buster project but alas I have added to the scrap bin. Unless I start another bin I will have to start working on that scrap bin. I think it is time to cut things up and sort by size for scrappy projects. I have had my eye on some great leader and ender projects over on Bonnie Hunter's Quiltville Blog.
So this is what 130 six inch blocks look like!
I also finished my last 30 blocks for the new project and will now figure out how to put them together. This was mostly a stash buster project but alas I have added to the scrap bin. Unless I start another bin I will have to start working on that scrap bin. I think it is time to cut things up and sort by size for scrappy projects. I have had my eye on some great leader and ender projects over on Bonnie Hunter's Quiltville Blog.
So this is what 130 six inch blocks look like!
Saturday, September 6, 2014
Starting A New Project
I always work well with multiple projects going at the same time. I do not really have any that are in the piecing stage so decided I needed another stash reduction session. I found a beauty over on Exuberant Color Blog in a color combination I really love, blue and green. The quilt pattern Crossroads was designed by Amy Walsh coauthor of the book Colorful Quilts For Fabric Lovers. You can see Wanda's version HERE on Exuberant Color Blog, and you can see Vicki's version HERE on Field Trips In Fiber Blog. Both are beautiful. I just knew when I saw this that I had to make it. It will be a very simple, fast quilt to sew up but it will be all about color. The hardest part I know will be to put all the pieces in the right places but really that is much of the fun to come up with placement of blocks.
I have been cutting into much of my blue and green fabrics the past three days for the 130 squares in a 6 1/2 inch size and 130 strips in a 1 X 6 1/2 inch size. Once I have 100 of each size I will start slashing the squares in inserting the strips. I will not cut the last 30 combinations till I have the rest sewn. This will allow me to audit the results and fill in with colors that will work best with the design I come up with.
I just snapped a few photos of the squares and strips I have cut so far. You can see it is a foggy morning here in New Mexico. The sun should come out this afternoon.
I have been cutting into much of my blue and green fabrics the past three days for the 130 squares in a 6 1/2 inch size and 130 strips in a 1 X 6 1/2 inch size. Once I have 100 of each size I will start slashing the squares in inserting the strips. I will not cut the last 30 combinations till I have the rest sewn. This will allow me to audit the results and fill in with colors that will work best with the design I come up with.
I just snapped a few photos of the squares and strips I have cut so far. You can see it is a foggy morning here in New Mexico. The sun should come out this afternoon.
Friday, September 5, 2014
Purple and Green Batik Sampler
I thought I was never going to finish the beauty. It is (as my friend Shelley likes to say) "a whole lot of real estate." I was not sure what to do with that wide triple border but find some inspiration online. I found a great video made by a longarm quilter who had a wonderful demo. I knew I just needed to try it. I did not do the same thing that was in the video, but I did break up the border into triangles quilted in different ways. I do love how it came out. It did take A LOT of time just for the border and I enjoyed doing it. I always love to learn how to do new things.
Being a Sampler each block is pieced differently so each block is quilted differently as well. I can now package it up and send it back to my friend in Arizona. Thank you Ellen for letting me quilt for you.
Thursday, September 4, 2014
Block Swap About.com Quilting 2004 Arizona Retreat
Today I was in search of two extra blocks for my Mountain Majesty quilt. I was going to use them for the pieced back but I never found them so I guess it will be plan B for the quilt back. In any case trying to make sense of all the stuff that I did find I decided to sew together the pile of blocks from a exchange we did at the 2004 Arizona Retreat. Boy did those bring back some memories of all the new friends I met for the first time that year. I think I will just put a border around this and make it a nice lap quilt for when I am watching TV or something in the cooler months. Each block is signed which makes them really special.
Tomorrow I will piece a back for the Mountain Majesty and get it loaded onto the Longarm so I can quilt it. I did finish up the beautiful sampler I was quilting for my friend and she will be getting it back in a few days.
Tuesday, September 2, 2014
Labor Day Weekend In The Rockies
I am very heartened with the quilting community. These are the blocks have been coming in for Nicole's comfort quilt. I posted about Nicole HERE She is slowly picking up her life and trying to put pieces back together after her home and studio burned to the ground. Thanks to all of you who have sent, or are still sending these beautiful blocks to make a quilt for Nicole's bed.
We headed up to Ouray again for Labor Day Weekend. This time with both daughters in tow. We spent one day 4 wheeling over Corkscrew Pass, Hurricane Pass, California Pass, down to Silverton for lunch and then back over all three passes. It was a beautiful day and the scenery was amazing. At the top of the mountains you just feel like you are on top of the world. It was a wonderful way to end Summer and welcome in Fall.
Now it is time to get back to work. I have to finish the quilt on the longarm for my friend. I had not planned to take two trips in such quick succession but have to say that I did have an awesome time and built some great memories with my family. Going places and seeing things also is great for inspiration for my art. I have been wanting to do at least one aspen quilt and have taken a few photos on this trip and hope to come up with a future design for a quilt.
| 4 Wheeling On Red Mountain Colorado |
| Red Mountain Colorado |
| Old Mine Near Silverton Colorado |
| Placer Mine Colorado |
| Having Fun 4 Wheeling In Colorado |
| Aspens |
Labels:
aspen,
Corkscrew Pass,
Ouray,
Placer Mine,
Red Mountain Colorado,
Silverton
Monday, August 25, 2014
Trip To Colorado
We started off heading North out of Albuquerque and went towards Cuba............humm that kinda means Durango and Southern Colorado................this is gonna be good. The first night we stayed in Durango at a very nice historic hotel. We saw the sights and listed to live music up on a deck. Very fun time. Next day we went to the train museum which was fun. Then we headed over to Silverton and stopped at the visitor center and got a map. We decided to take the Ophir Pass across and see Telluride. The pass was not bad and there was one spot where Mr Enchanting asked me to get out to check that he was doing ok, yep the car went into the right traction control and went up on three wheels..............cool! Then a slow descent, the road was very narrow and very steep............much steeper than it looks in the first photo! Then lunch in Telluride and over to Ouray for a few days of fun which included staying at a great B&B a hike, some 4 wheeling up to Imogene Pass and a Beer Festival. Yes we made some awesome memories!
| Going down Ophir Pass Colorado |
| Near Ridgeway Colorado |
| Ouray Colorado from the Perimiter Trail |
| Near Ouray Colorado |
| Mr Enchanting on top of Imogene Pass Colorado |
| Abandoned Mine Near Imogene Pass Colorado |
| Yankee Boy Basin Colorado |
| Near Imogene Pass Colorado |
Labels:
Imogene Pass,
Ophir Pass,
Ouray,
Yankee Boy Basin
Thursday, August 14, 2014
Progress on Ellen's Quilt
This is Ellen's quilt and it has taken up residence on my longarm. It is a beautiful sampler and I am having lots of fun thinking up quilting designs for it. She wanted a touch of modern more than traditional so here is a sneak peek of my modern take on the outer borders. The final two borders are really wide so I have broken them up by combining the final two with a zigzag line alternating piano keys on the outside and some nice pleasing loose swirleys freeform on the inside. Sounds pretty easy but it is a lot of ruler work. For the inner border I went with a fun swirl and squigley lines. I am pretty happy with how it is taking shape and hope to have it off the longarm in the new few days.
I also got my Mountain Majesty blocks all sewn into a "flimsey". That would be a quilt that is just the one layer without backing, batting and quilting. They change so much from flimsey to quilt.
I am excited that I have quite a few blocks that will soon be arriving for Nicole's comfort quilt. If you would like to make one please leave me a comment and I will e-mail you my address. I hope to have some photos of the blocks coming as these start to arrive this coming week.
I also got my Mountain Majesty blocks all sewn into a "flimsey". That would be a quilt that is just the one layer without backing, batting and quilting. They change so much from flimsey to quilt.
I am excited that I have quite a few blocks that will soon be arriving for Nicole's comfort quilt. If you would like to make one please leave me a comment and I will e-mail you my address. I hope to have some photos of the blocks coming as these start to arrive this coming week.
Monday, August 11, 2014
Comfort Quilt For NIcole
I have a friend in the Methow Valley in Washington State whose home and studio just burned up in the fire. She is devastated in loosing everything. She is a jewelry maker and makes some wonderful unique items. To read more about Nicole you can visit her blog HERE I am putting together a comfort quilt for her bed. The colors will be as you see in the photo above; dark brown/light brown or cream/medium to light blue. If you send a block please sign your block and put your city and state. The block is a 12" churn dash that can be found on Quilters Cache HERE
If you would like to send me a block for her quilt please leave a comment and I will e-mail you my information on where to send it. I will be posting progress of this quilt in the coming days and weeks.
Wednesday, August 6, 2014
Block Layout Is A Success
Since I have been working on so many UFOs this is my reward quilt that I started just recently. The blocks went together very fast and then I got stuck on the layout. I finally had it all decided in the traditional layout of Mountain Majesty until I saw this layout on a blog and changed my mind. The good thing about this layout is that I also already know how I will quilt at least the orange parts. Now to get busy and put these blocks together..............right now they are just laid out of the design floor and photographed from the second story looking down.............at least it is an option till I get a real design floor.
Here is the Pineapple Christmas Table Runner with the border sewn on. I made nice mitered corners. I have not made a miter on a border for some time but figured that this is going to be on a table top and I want it to look its very beat. I am going to quilt a large sampler for a customer and then this will be next. I am pretty excited that this UFO will finally be done soon. I started this project at least 10 years ago.
Tuesday, August 5, 2014
First Finish For August 2014
I have finished my Improv quilt and am calling it A Walk In The Woods. The colors and the movement bring to mind hiking in the tall trees with the trunks. There are spots of blue where you see the sky and spots for green. I really love the flow and colors in this piece. It is not meant to be straight and the sides and bottom are gently curved. It measures about 36 X 41". I posted a tutorial for this quilt back in January and you can see it HERE
I enjoyed the process of working on this quilt. It was very freeing not to worry so much about block construction and to be able to work with form and movement. The little blue and green pieces were gleaned from the scrap bin as I am always trying to make a dent in it. Of course the quilt generated more scraps than I used but those will be for another day and another project.
When it came to choosing the binding a problem presented itself. I do not have a stash with yardage so the fabrics used in the quilt were no longer available to do a binding. I needed bias because the edges were not straight and a binding with the grain would pucker. I found a quarter yard the width of the fabric in a perfect color that tied all the colors in the quilt together perfectly. It was the exact color of the thread I had used for the quilting. Well making a bias binding for that would use very short strips so I kept looking. In the end I came back to the first fabric and had an aha moment. Cross grain has some stretch, if you cut it at a greater angle there is even more stretch. I finally decided to go with an angle to get the longest strips but not a perfect bias. The stretch in the strips was still good. Please do not tell the quilt police on me! The strips finished at 20" which meant there were two seams on each side of the quilt in the binding.
For the quilting I first went with wavy lines which added vertical movement with the piecing. I then filled in the colored inserts with a modified "spiral" design. I also did pebbles in the pieces between the inserts. Then I went back and filled in a line of pearl between some of the wavy lines. Looks simple but I spent 12 hours quilting on the longarm.
This past weekend we took the bike out for breakfast and a day of riding up east of Santa Fe, New Mexico. We visited the Pecos National Historical Park just south of the town of Pecos. It was a huge ruin. In its heyday the pueblo was 5 stories high and had 2000 residents. The sign shows what the site looked like during its better days. Now it is just a mound with a few areas where they have excavated. The panoramic view that these people had was awesome.
I enjoyed the process of working on this quilt. It was very freeing not to worry so much about block construction and to be able to work with form and movement. The little blue and green pieces were gleaned from the scrap bin as I am always trying to make a dent in it. Of course the quilt generated more scraps than I used but those will be for another day and another project.
When it came to choosing the binding a problem presented itself. I do not have a stash with yardage so the fabrics used in the quilt were no longer available to do a binding. I needed bias because the edges were not straight and a binding with the grain would pucker. I found a quarter yard the width of the fabric in a perfect color that tied all the colors in the quilt together perfectly. It was the exact color of the thread I had used for the quilting. Well making a bias binding for that would use very short strips so I kept looking. In the end I came back to the first fabric and had an aha moment. Cross grain has some stretch, if you cut it at a greater angle there is even more stretch. I finally decided to go with an angle to get the longest strips but not a perfect bias. The stretch in the strips was still good. Please do not tell the quilt police on me! The strips finished at 20" which meant there were two seams on each side of the quilt in the binding.
For the quilting I first went with wavy lines which added vertical movement with the piecing. I then filled in the colored inserts with a modified "spiral" design. I also did pebbles in the pieces between the inserts. Then I went back and filled in a line of pearl between some of the wavy lines. Looks simple but I spent 12 hours quilting on the longarm.
I really like the definition in the darker colored thread in the light areas of the quilt. I used Superior thread in So Fine (medium brown) for top and bottom.
Then we headed north along the Pecos River all the way to the end of the road at Jack's Camp. On the way back down we stopped Cowles. This is just a crossroads that gains access to National Forest campgrounds and trail heads in the Pecos. It was a wonderful day filled with beautiful scenery. Because of all the rain everything was very lush and green.
Tuesday, July 29, 2014
Fabric Bins
I got all my blocks sewn for the Mountain Majesties quilt in blue and orange. These really went together fast and easy. I have laid them all out and thought that I was happy with the arrangement so I picked them up in order. Then I was looking at quilts on Pinterest and found a different setting so now I need to lay them out in that setting and photograph both settings to see which one I like better.
I have been seeing lots of fabric bins lately and decided to try to make one or a dozen. Actually the idea is to make a group of them for scraps. The bins will be the color of the scraps that will go into them. At least that is the plan. I found a tutorial and decided to give it a try with a few changes of what goes inside. Well the instructions were flawed and there are some problems with the bin above. I decided that I knew what the dimensions should be and decided to change the way to sew it and made the bin in the bottom photo. They are exactly the same size but the one on the bottom came out much nicer. The one on the bottom is also made out of upholstery fabric as I knew what the kinks were in the instructions and I was petty sure I had it figured out................it came out just right!
These were the test bins so now I just need to change up the measurements and make larger ones for my scraps. I really do like these little ones though and will make a few more as they are just the right size (4X6 by 3 inches high) to hold a few things. I tossed some thread spools in them but they would work great for other notions, cell phone and keys, jewelry or whatever.
I have been seeing lots of fabric bins lately and decided to try to make one or a dozen. Actually the idea is to make a group of them for scraps. The bins will be the color of the scraps that will go into them. At least that is the plan. I found a tutorial and decided to give it a try with a few changes of what goes inside. Well the instructions were flawed and there are some problems with the bin above. I decided that I knew what the dimensions should be and decided to change the way to sew it and made the bin in the bottom photo. They are exactly the same size but the one on the bottom came out much nicer. The one on the bottom is also made out of upholstery fabric as I knew what the kinks were in the instructions and I was petty sure I had it figured out................it came out just right!
These were the test bins so now I just need to change up the measurements and make larger ones for my scraps. I really do like these little ones though and will make a few more as they are just the right size (4X6 by 3 inches high) to hold a few things. I tossed some thread spools in them but they would work great for other notions, cell phone and keys, jewelry or whatever.
Subscribe to:
Posts (Atom)