Saturday, May 23, 2020

Brown Linen Pants Simplicity 8922

After making the purple muslin pants to test Simplicity patter 8922 I decided to make another pair slightly looser as well as a bit cropped to show off sandals in the warmer weather. I found this brown linen fabric in my stash and decided to make the second test pair out of this as it was so similar to the blue linen I was waiting to use. These pants are kinda loose, baggy and are kinda like wearing pajamas. I have decided I do not need three pair so am not going to use my blue linen. This brown pair is very versatile and will go with a ton of things. They fit the casual warm weather attire so I am calling it good. They are a tad baggier than I would like but I am not going to fix them. The pockets also add bulk so if I make this pattern again I will leave the pocket off to give a smoother fit over the hip area.


Kinda like this thrifted white linen top to give these an effortless casual vibe.
Just wish I had somewhere to wear this.

I do love the detail at the hem and may use this treatment on other patterns. For now I do not need more of these in my wardrobe. That said I want to make a pair of these pants and a little matching top as longewear/pajamas to wear around the house.

I did have some fun playing with a few outfit ideas. Love this sweater with 3/4 length sleeves I thrifted last Fall. The bag is also a $1 thrift store find from a couple of years ago.

Same outfit with a linen shirt, thrifted last Fall as well.
And...........a blue t-shirt that I made recently. Brown and blue always look great together.
Here is the patter, I made view D and highly recommend the pattern. I did french seams on the inseam and crotch seam. The side seams are serged because of the pockets...........next time I am leaving the pockets off and will also do french seams on that as well. This is a fun little pattern to sew and it goes together pretty fast.

Friday, May 22, 2020

And Just Like That She Made A Rainbow

Ok I am done making hexi cubes now! I guess I just needed to see how this would look. I made a rainbow of colors in three sizes and really like this setting. They are just laid out on the grey deck and I even like the gray background so guess I need to find a largish piece of grey in the stash now. These hexi cubes are pretty addicting and I know I will play with them again but for right now I am happy with this arrangement and think this will be something fun to hang on the wall somewhere once  it is finished.

Thursday, May 21, 2020

Fine Tuning The Hexi Cubes

These blocks are quite intriguing as well as tricky little beasties. I decided that the green one I made needed some tweaking as far as the size of the rhombus shapes on the outside of the triangles. I made them at a 1" finished size and decided they were a bit thick so wanted to see if they would look better if I made them narrower. The triangles are 3" top to base so instead of 1" strips I cut them down to a 3/4" finished size. I think I like them better a little narrower. The plan moving forward will be to make three sizes of blocks. The smallest will have 2" triangles and 1/2" strips, the middle size (the blue one pictured) will be 3" triangles with 3/4" strips and the largest will be 4" triangles with 1" strips. I plan on making each one of 7 in a rainbow color so stay tuned for progress.  also think that the contrast of the dark, medium, light really needs to be pronounced. The light on the green cube is not light enough to really make the block pop like I want it to but the blue one really pops. Finding the right three shades for each block will be a real challenge but one that I am gonna try to get just right.


If you look at these two blue cubes what is wrong with the one on the right.............yup I did not realize the problem until I had photographed the block. When I made the cube I laid out the parts and thought I was being careful comparing it to the green one but I guess I was not careful enough and got the triangles correct but not the strips. I had to do a bit of unsewing and resewing to correct the problem to end up with the block on the left.................you really need to pay attention to what you are putting together when making these. I am able to piece them pretty accurately by machine though so they go fast if you do not sew something together wrong.

Wednesday, May 20, 2020

Look What She Made Me Do


My friend Shelley kinda became obsessed with making these hexi 3D cubes and has been posting here growing collection that she is carefully English paper piecing in a little size. Well I have been seeing them all over my Pinterest feed lately and I guess I finally fell off the wagon yesterday and decided I had to try one. I recently was gifted a huge amount of fabric..........some of it is amazing and some very cheap cotton. I washed all the cotton and it has been sitting in my sewing room waiting to be ironed and folded and put away. Well I made an apron and used some of the dark green which is very still and not the best quality. The backside of that fabric is the lightest green and then there was the clover fabric.................humm..................I decided to make a practice cube entirely by machine out of that selection.  The triangles are 3" finished and the outter parts of the triangles are 1" finished.

I was able to cut all the parts out with this ruler and sew them up on the machine. The finished block is 10 inches finished size from one side to the other or 11 1/2 tip to tip. The block was very tricky and there was a little wasted fabric as well as a little session unsewing with Jack but in the end this went together all by machine in a little over and hour start to finish. Now that I know what I am doing and also have this practice block as a visual guide I think I am going to make up a little wall hanging using these blocks...................Thanks for the inspo Shelley.............see what you made me do!

Friday, May 15, 2020

Tidepools


Some years ago I fell in love with improv quilting. I just loved working with color and shape and watching things come together and then figuring out what to do next. I love watching something come together that I have no idea what the final outcome is going to be. This little top is the fourth in the series of wonkey circle technique that I came up with some years ago. I cut these squares at 12" some years ago in colors that remind me of surf and sand at the oceans edge. The squares sat there for quite a few years. I always found something else more colorful or exciting to work on. Two years ago for the 2019 retreat I had to figure out what to work on during the retreat and I figured why not, the squares are ready and I did not have to do any additional prep work so I grabbed them. I was going to title this "Day At The Beach" but once I took it off the longarm I decided it reminded me more of tide pools. As the tide goes in and out twice every day the shoreline changes with that ebb and flow. That is kind of how life is, always changing, never quite the same from day to day, just like those pools that are always just a little different. I finished the quilting on this last November.

I had finished a large forever project on the longarm and decided this top was small and might be a quick finish. First I did a stitch in the ditch around each different fabric. You can't see it but it is there. While I did this the idea came to me to make long undulating lines with some pearls in the center that look like they are behind the other shapes.
I really loved the look this gave. I also did different fills between different lines. Yes there are a trillion little pebbles, and no this was not a quick easy quilting finish. There were many hours of quilting in this little wall hanging.

I am really happy how this came out.

This is the design wall at the retreat. I just kept making blocks and putting them on the wall. I rearranged things till I was happy with the design.

Then one final tweak with the help of my friend Kim and I ended up with this setting.

All the blocks got trimmed up to nice squares. You can see all the puckering, that is just what happens the way I put these together and yes it does quilt out. Since I quilt my own quilts I am the one that is in control of making it all lay out nice and flat in the end. This little top sat for almost a year before I got to quilting it.


And.................here is the finished top. The setting is the same but I decided to turn it upside down.

Tuesday, May 12, 2020

Carpenter's Wheel Quilt Top


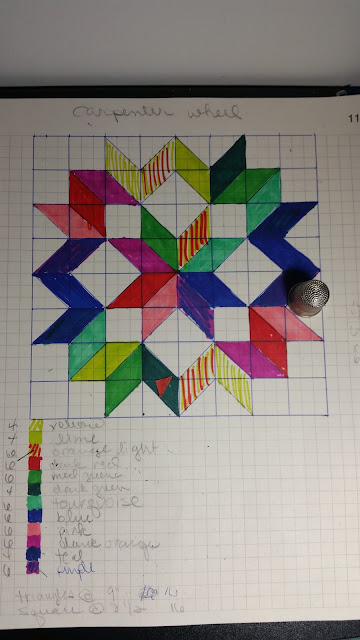
I have always loved the carpenters wheel quilt setting since I began quilting way back in 1984. It is a timeless setting and goes well with any era of fabrics from antique, vintage, to everything else. Making a big carpenter wheel has been on my quilters bucket list for, well since I first laid eyes on one.  I found a setting on Pinterest that had rainbow colors against a cream background. I made myself a color chart on graph paper. I think I like the blue at the top left...........what do you think?

I go to a retreat in Phoenix every February for quite some years now and was trying to decide what to bring to work on this last retreat. I came across a large piece of black/grey grunge fabric in my stash and thought it would be enough for a spectacular background. Next I spied a bin of hand dyed fabrics and wondered if I could pick a selection from the bin to make a rainbow or close to a rainbow. Well a couple of hours later I had a pile of 10'' squares. This was going to be a perfect project for the retreat, big, a lot of impact and EASY!


Well turns out that this was not so easy as I thought as I just started sewing half square triangles and quickly realized that each combination was pretty unique and very close attention had to be paid to my chart. By this time I had put the pedal to the medal of the sewing machine so I got to spend quite some time ripping many blocks apart and starting again. It was very rewarding to watch the large quilt quickly being assembled on the design wall...............yes this was a wonderful choice.

Once I got all the blocks made I took them off the design wall and packed them up to finish this project at home. I had made the blocks a little oversized so I could trim to the perfect size (my favorite trick to accurate piecing).


I had just the right size ruler to square them up too.


The ruler by creative grids made the job really easy!


Here are the little bits and strips I trimmed off, and voila a stack of blocks ready to go. I finished sewing up the top last month right after the shelter in place started. I am very excited to quilt this beautiful top but alas my longarm machine is in Colorado and I am sheltering in place in New Mexico so I am keeping busy with sewing clothes and a few quilting projects as well.

Monday, May 4, 2020

The Twenty Year Jacket

Usually when I have a sewing project it either gets made and worn in a fairly quick time frame or it is discarded half made as something that just did not work out for some reason or other. Well not this jacket.


This pattern is from 2001 and when I got it it had just come out. I remember just loving the look of the jacket. As you can see I got it on sale for $1.99 from Hancock Fabrics in Seattle when I lived there many years ago. I got all the materials to make the jacket along with the pattern. The fabric is a knit that has the look of suede and a snakeskin pattern.............this just proves that animal prints are really timeless. In any case if you look at the models on the envelope you can see that the jacket is nipped in at the waist and is nicely fitted..............well not the actual pattern. I remember the disappointment when I tried it on and the fit was loose and boxey. Not the look I was going for. Well I set it aside. Over the years I have pulled it out and looked at it (I have always loved the fabric and the idea of the jacket so I never got rid of it but cropped jackets kinda went by the wayside as well). At some time in the past I guess I must have decided to finish it because I had unpicked the lining and pinned the waist at all the seams around the jacket to nip it in more. Well this is how I found it in the past year. I decided I would take it up to the RV and finish it. When we were grabbing stuff to bring back to New Mexico for quarantine this was one of the things I tossed in with the sewing stuff. It came to the top of the pile a few weeks ago. I tried it on again and the pinned waist treatment looked good so I resewed the seams. Hemmed the lining and finished the sleeves. It took a part of an afternoon and voila......................Ta Done!!!!!! Only about 20 years in the making.


The jacket has a beautiful blue satin lining which adds just the right amount of warmth for a cool morning or evening and helps the jacket easily slide on and off. I love the blue with the rust as well.


I love the zipper closure on the jacket as you can zip up all the way, part of the way or have it open.

I think this really does not look dated and feel with jeans and a white t-shirt it looks quite trendy, almost like a faux brown leather jacket.............maybe that is why I like it so much.
After 20 years this jacket is finally out of the sewing stash and into the closet ready to pull out to ward off the chill or just to wear on a cooler day when you really only need one extra layer.