Saturday, May 31, 2014

Improv Series

The goal this year is to work on UFOs and I have been going like wildfire on that task. I have quite the stack of tops accumulating ready for quilting. These began as piles of blocks. Well one can only work on UFOs for so long. There needs to be some stuff just for fun.

Yesterday I picked up the squares I had cut for the Improv series at the Arizona Retreat and decided to make some progress. Well I got on a roll and out of 9 squares I have 4 when I started. I made 5 more and the blocks were ready for trimming. Today I worked on the trimming and got them all trimmed. I loved the way they looked so decided to sew them together. Think giant nine patch. This really did not take very long as there were only a few seams to match where the blocks came together. With these blocks I was using complementary colors; orange and blue. This series will be called over the limit and this orange and blue top is Over The Limit II. The second in the series.
Over The Limit II
The first in this series has a tutorial that I posted February 15 2014. It is Over The Limit I completed the top at the Retreat in Arizona. I love the technique so much that I started the second in the series. There are a few design problems though. The blocks become very skewed as they are sewn and there is a lot of waste in the technique to trim the blocks into squares. I think I will try changing up the technique for the next one in the series. I want to work in a grey/black colorway next with an accent color. Below the Over the Limit I is a top called Energy. It was pieced as a challenge for the Arizona Retreat this year. The challenge was to use lumberyard cuts and make a quilt. I did not want to do something traditional so instead came up with the striking color choice for deep blue and orange and set the jagged line offcenter. I really love the impact of this one.
Over The Limit I


Energy                                                                                                                       
I finally got all the cats herded together into a finished top and found some fabric in my stash for  the borders. I got the first border sewn on yesterday and hope to get the second border sewn today so this one will finally be ready for quilting.

Tuesday, May 27, 2014

A New Stash Buster Project


I have finally allowed myself to start something new. This is from Bonnie Hunters Quiltville site and is called Scrappy Trip Around The World. It is a great stashbuster. You can find the tutorial on Bonnie's site HERE

I have been tying to come up with a way to use those fabrics that I no longer love.........ok I actually hate some of them and just do not want to keep looking at them every time I go thru the stash. This quilt seems like a great way to easily sew up tons of yardage of fat quarters and large scraps. I took the plunge and forged ahead and starting cutting the 2 1/2" by 16" strips. Wow did that go fast! Today I timed myself on the second block and it took about 30 minutes start to finish. I bet I can get it down even faster if I try. I think this will end up being a long term project like a leaders and enders. In the end I will be rewarded with those fabrics gone!

There are some fabrics in those two blocks that I got my first year quilting...........I think that was 1984. They are the tan and the blue next to it in the second square. I am not saying I hate all those fabrics but my current tastes have moved away from focus fabrics and such to tone on tone, handyes and solids so I am glad to find a project to use up some of these. I know that as I go along some really nice fabrics will end up in this quilt as well..............I do want to like it when I get done. I am looking forward to using up lots of fabric in this quilt that am a just plain tired of trying to figure out what to do with.


Thursday, May 15, 2014

Cat Blocks in Cat Fabric

These are cat blocks in cat fabrics form a swap on About.com Quilting around 2000. There were lots and lots of rounds of swaps every month by several hostesses. Each month we made 12 cat blocks of one fabric and got back 12 new blocks. I have already made a queen sized quilt for daughter number one from the cat blocks in cat fabric swaps. I quilted that queen sized quilt on my domestic sewing machine using the stuff and fluff method. Yes it can be done. The rest of the cat blocks were put away to age. The intention was to make a twin sized quilt for daughter number two.

In my quest to finish UFOs I have been pulling out piles of blocks from various swaps. I came across the cat blocks and decided these have aged long enough. I actually had to make about 14 new blocks as there were not enough. I also had some sets of up to six of the same block and did not want that many repeats. I found fabric in my stash that was cats but had not been made into cat blocks so made up sets of two each. There were also a few blocks that were from fabrics thin enough to spit thru so will not use those. In any case here are the finalists in all their glory ready to be sewn together.

I am asking myself of late why I have so many UFOs. I am actually scared to catalog all of them in fear of realizing how many I have. After some soul searching I have come up with a few reasons. First there are so many ideas out there that I find I am easily distracted and want to jump into something I find that I want to make and then run out of steam. Many projects take a lot of time design, layout plans, cutting, piecing, borders and rethinking layout, to quilting, binding and that final label. It is no wonder with all of this that one can run out of steam or motivation midstream. Second I find that when working on something there is always a design element that is not right, or more blocks are needed (as in a swap), or some of the swap blocks are flawed and have to be fixed or replaced, the border design is just not jelling like it should and requires more though. All of these things can send a project off to a bin, box or far corner of the sewing studio to be buried and forgotten. Then there is the call of something new that suddenly becomes urgent, a gift needs to be made, a contest sounds intriguing or sometimes a new design is just calling. Current projects can be case aside in an instant. It seems the longer something ages the less likely I am to go back and pick it up.

I have decided that this year is going to be different. Yes I will begin new projects but I am making a huge push to finish up some of my UFOs. So far I have a bin that contains 5 tops that started this year as a pile of blocks. They will soon be joined by the cat quilt top. Some of these quilts require borders and the fabric is already waiting for some of them. The next steps will be to push these tops to quilting ready and get them quilted. For me once a quilt is quilted I always want it done so the binding goes on very quickly as does the label. I feel I am well on my way to my 2014 goal of finishing TWELVE quilts this year. Not all of these need to be UFOs. I do have three new things I started this year and they are now in the ready to be quilted category but I am not calling them UFOs yet as they have not aged long enough for me to call them such.

Sunday, May 11, 2014

Happy Mother's Day!

Happy Mother's Day!!!!!

No quilting here today. I spent the day out on the trail hiking.  It was just right not too hot yet and there were lots of flowers out.

I have been busy sewing tops and since my last post I have put together the Bears in The Cabin into a top. It still needs a border. The Dear Jane top with the red setting triangles is also put into a top and I am trying to decide if it really needs a border. I may just leave it as it is with the blue alternating blocks and the red setting triangles there is already a lot going on. Currently I am working with some cat blocks in cat fabric from a series of swaps on About.com Quilting Forum from around 2000. I am making a few more blocks and then I will have enough to make my younger daughter a twin sized quilt. I made one for here big sister years ago and she is telling me it is about time I got around to working on hers. Once I have that top pieced I will post some photos of my finished tops.

Saturday, March 22, 2014

Working On More UFOs

If you have been quilting for very long then I am sure that you have a few unfinished objects or UFOs. I have been quilting since about 1984 so I have a few UFOs. Well to be honest I have no idea how many I do have, but I know it is quite a few. I am pushing myself to work on some of these and even if not get them finished just get them to become finished tops. The Fossil Fern Stars quilt is now a finished top without a border. I am still thinking about a border plan for that but while I do I am itching to get going on more projects.

I dug a few bins out of the shed and found some blocks from swaps I had done over the past few years. The one on the front burner is from a log cabin and a bear paw block swap. The blocks are 6" square and are scrappy. I have enough for a nice size quilt for over the sofa or to fit over a double bed. I laid them out on my queen bed and if I add another row of blocks to the top and bottom plus a border it should be just about right. I do need to resew some of the blocks from the log cabin swap as they do not read dark and light. I need 12 log cabin blocks and have 10 that are problem children as they have logs that are dark on some of the light side or vice versa and being the control freak I am that bothers me so I will pick out the offending logs and sew them back together. I have the 4 bear paw blocks needed so those are good. Here are the blocks laid out so far without the two extra rows.

I may change things up a little but for the most part this is what the quilt will look like when pieced.

I also pulled out some 9" blocks from a Dear Jane block swap. For this one I am going to set the blocks on point with a solid color block in alternating squares. Then the setting triangles will be a different solid. Then a border that I have not figured out yet. Again there are some problem children with the blocks that I have so I will correct the problems and make a few more blocks as I need 30 blocks total for my setting. It will fit my Queen bed.
This is not the best photo. I had not planned on positing it when I took it. I just wanted to remember the way I laid things out. This does give an idea of what the layout will look like though. There will be 6 blocks down and 5 across. I need to figure out yardage of the fabrics I will need so I cannot work on this till I go shopping.

Then I pulled out some blocks that were gifted to me by a friend. I am not sure where she found them but I really love vintage quilts. That is really what brought me to quilting when I first began. I have 24 of these blocks and the fabrics are most likely form the 1950's. I am going to set them on point as well with solid blocks alternating. There are again some blocks that were not sewn together very well so I will have to pick some apart and fix them. With this quilt this is a necessity as it will not work without fixing some of these. They are completely machine pieced so once I draft a pattern it should not be so hard. One of the blocks has a black dot in the center so I will add that to each block. I only have 24 blocks and need 25 so I have to find fabric in my stash and make one additional block. I do have just the right yellow solid that actually matches. This will be a labor of love but I am pretty excited about this particular project.

I actually do not know the name of this block so would like to know what it is. Remember there is a dot in the center.


Wednesday, March 12, 2014

The Design Floor

I really need to get a design wall. Well actually in this case it would not have done the job as this is going to be a really big quilt and it would not have fit anyway.

This is the project I recently pulled out of storage to work on at the retreat I attended last month in Phoenix. I did a couple of block swaps on About.com Quilting some years back. We swapped stars in Kona Black and Fossil Fern that had to have more than 12 pieces in complexity. They were really beautiful on their own but recently when I dug them out I decided to do sashing and corner stones to add a bit more. I am glad that I did. I finished the last of the sashing and cornerstones this past weekend. Today I moved the furniture out of the way in the living room and put down a sheet and laid out all the parts. The good thing is that I can look down on them from the balcony above and get a birds eye view. My daughter also gave some input. So here they are all laid out:

Once I got my photo I rolled up the sheet on the diagonal and took it to the sewing room. Now I can slowly unroll it and sew the rows one at a time. Once that is done I will add the large triangles to the outsides and decide on the final border treatment. Hopefully now that I am going on this project again I will have this top sewn together pretty quickly. I think it will make an awesome quilt for my bed.

Sunday, March 9, 2014

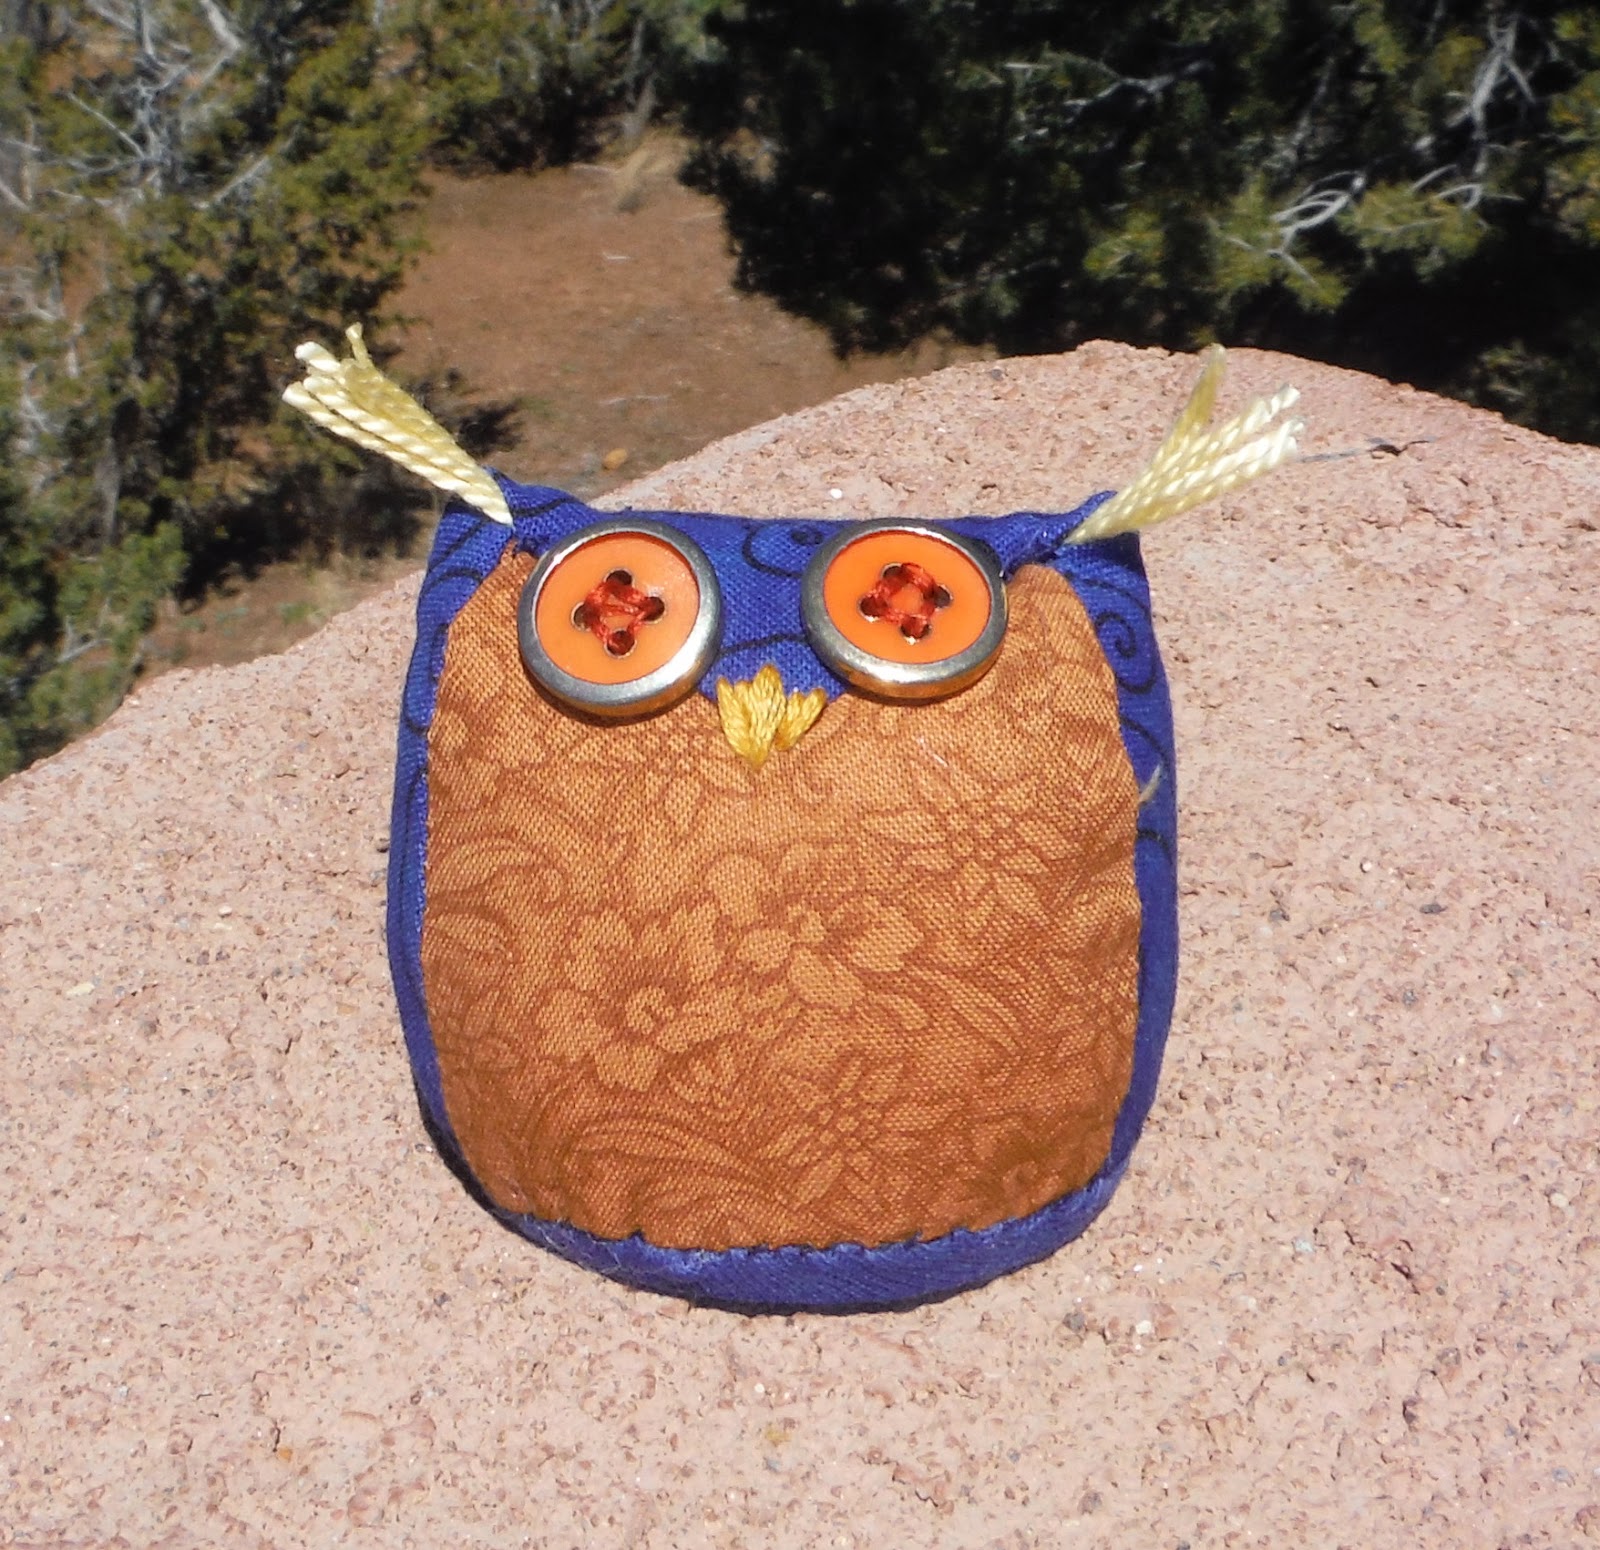
Owl Pincushion

I have been looking at these little sewn owl for some time. I decided to try one today and see if I could figure out how to make one with my own drafted pattern.  He is about 3" tall.
I added a feature of my own the little tufts on the top of his head. He was really fun to make and is soon to take a journey to a new home as I am sending him to a friend of mine. I will definitely make another one of these.

Saturday, March 8, 2014

Scarf From Upcycled Polo Shirt

The other day DH tossed a very well worn polo shirt. It had a few stains and some holes to boot. The fabric was a cotton knit and it was just the right drape and fade to keep for an upcycle project. I decided to make a scarf and a flower from this reject.
There was plenty of fabric in the two sleeves to make three different size flowers. The largest ring is 3" and the smallest one is 2". The drape of this made for a less stiff flower than the last one I made out of a much newer t-shirt upcycle so I had to do a lot more stitching inside the flower to help it hold its shape.


I used a 9" ring to cut 10 circles out of the body of the shirt. Then I cut a spiral about 2" thick out of pairs of these circles. I put 5 strips on each side and tacked them with thread. Then I cut a strip of fabric and wound it around the joined area and tacked it in place. I tied the scarf in a loose knot and added the large flower with a safety pin. It all took less than an hour to make. I think I will wear it tonight to go listen the band down at the pub.


Sunday, March 2, 2014

A Blue Rose

I have a coworker that has been out for six weeks. I really miss her as she makes the most wonderful fabric flowers and always wears one in her hair. She seems to have an endless variety of them in all styles and colors.........bet she does not have a blue rose, so I made one for her out of an upcycled thrift store t-shirt. I hope she likes it. I think I have to make one for myself as well as I still have plenty of the shirt left over. I have already made a scarf out of it and the roses is just from a sleeve and a little from the neckline that was left over.


We finally got some moisture. It really poured last night at the house, but it dumped 14 inches of new snow up at Santa Fe Ski Area so we had a day of skiing today!!!!! What fun!!!! I am learning how to take selfies, me on the chair. A day on the slopes is about the most fun..........the quilts can wait!!


Saturday, March 1, 2014

Back From The Retreat

I used to go to a quilters retreat every February in Phoenix until I went back to work and got so busy. Now that I am back to working part time I reconnected with my quilting friends and went to the retreat last weekend after a three year absence. It was so wonderful to just be around quilters and not have anything else to do for three days but work on projects, visit and go shop hopping. I really got inspired to begin working on some older UFOs that had been put in boxes and were stacked out in the shed.

I finished my Improv III top but did not take a photo. That is the only regret about the retreat, not taking enough pictures. I did take some which is good. I liked the Improv III so much in the cool colors that I had precut another group of 9 fabrics in oranges and blues. I made the first two blocks at the retreat and love this colorway!
I finished another set of two blocks earlier this week but the circles are more oval than rounded so I will recut the two fabrics and make another set as I really love the colors with the pair above.


When deciding what to work on at the retreat I pulled out blocks I had done on an internet swap quite a few years ago. The theme was to make 12" blocks with stars that had to have more than about 14 pieces. The background had to be Kona cotton in black and the other fabrics had to be at least two different colors of Fossil Fern. I took all my black Kona cotton, the stack of 20 pieces of Fossil Fern fabrics in my stash in a rainbow of colors and the stars. I decided I would figure out what to do at the retreat. I found a design wall all the way across the very large room. This turned out to be a good thing because I could see the impact from a distance. The first thing was to put up the blocks. I was going to do a simple black sashing but decided the quilt needed more so I set to work making sashing useing the variety of Fossil Ferns. I also decided to make the cornerstones 3" nine patches. I had no idea from the onset that I needed a total of 80 sashings and 40 nine patches. I only have about half pieced as of this morning. You can see the photo of the beginings of the sashing and nine patches on the design wall at the retreat. I think I am really going to love this quilt when it is done.


 My friend Suze took a class at the Road to California on painting with Tsukineko fabric inks. She brought her inks and some PFD fabric to the retreat so we could play with them. She had some coloring book outlines which we put underneath the fabrics. I love the technique and will definitely be getting some of the inks for myself. I made this cute little chipmunk painting. I think that the inks will work very well for some future pictorial quilts I have planned.


Since I drove to the retreat I decided on a whim to take this old sewing machine that I got at a yard sale for about $5-$15 in the 1980's. I have been dragging it around for about 30 years now and have never done anything with it. My friend Nyla works on old sewing machines and I wanted her to have a look at it. She gave me some advice on how to clean it up, and get it in working order.  I just love the squared off left side and the vine pattern with the gold and green leaves. It will be fun to see if I can actually get her sewing again.


Saturday, February 15, 2014

Improv III started

I have been pretty excited about this project since I saw this site:
The Ripple Effect

Wow what a fun concept and what a dynamic impact without a lot of fussy piecing. With the limited time I have of late to work I decided that this type of piecing was something I had to try. I forged ahead and started with a palate of fabrics in cool colors but have since also decided to make a version in orange and blue with some yellow and reds thrown in just for fun..........in other words I will begin a series with this concept and see where it goes.

Here is the first project in the Improve III series. I am going to call mine wonkey drunken paths as this is really nothing more than a drunkards path block remade to be wonkey and improvisational with a series of curves instead of the one for the original drunkards path.

My palate began with the cool side of the color wheel that includes lime greens, turquoise and purple. I love these cool colors. I cut out one 18 inch square of the three fabrics on the far right of the photo and got started. I used the tutorial from the Quilting Edge. I made my seam allowances narrower than hers at about 1/8" to 3/16" inch instead of the 1/4" that she used as my quilt will be wall art and will not be washed or used for a cover of any kind. In other words it will have a gentle life so does not require the larger seam allowances. This also likely makes the seams lay a bit flatter and allows for more curvey features.

The first thing that I did with my squares was to cut the notch in the top right corner of each as was recommended in the Quilting Edge tutorial. I do not really see that this needs to be done as once I put my first cut in I knew where the bottom left corner should be so in the future I will leave that step out. I laid the three fabrics in a stack and just took my rotary cutter and made a cut that was not a smooth quarter circle. In the photo below you can see the three fabrics with the same cut. Now find what fabrics to pair and get sewing that first seam on all three.

 I decided to pair them so as below. This is the first seam sewn on all three blocks. It might be hard to see as the green one is laid with the blocks on top of each other so it is hard to see they are separate pieces.
 Now I laid all three blocks on top of each other again and cut another wonkey arc with the rotary cutter. I kept the same fabrics instead of mixing things up more with this first set as I really just wanted to see how this was going to work.

 This is that second arc sewn with the purple and the green. The blocks were all laid on top of each other again and another cut was made. At this point you can see that the right side is notched and does not line up exactly. Not to worry these blocks will all be trimmed at the end so that will not matter. I sewed these by laying the two pieces on top of each other and having the inner or smaller part underneath. I just began sewing with no pins and kept moving the top part to line up with the piece underneath. When the seam is finished I pressed the seams towards the center of the semi circle.


Here is the next arc added and another cut made for the last round of this three blocks.


And.................here is one of the three finished blocks. This process did not really take very long. Now to play with the remaining fabrics and cut up 6 more 18" squares and make them into blocks. I have already eliminated and added to the original palate.


From this point on my quilt will not progress as the tutorial as she quilted each of her blocks separately which is a good idea if you want sashing between the blocks. I do not want a sashing and I have a longarm quilting machine so see no advantage to working with each block separate. I do know that I already really like this process and am pretty excited to have a finished wall quilt from these blocks so I am pretty motivated to keep going with this project. I will be teaching a small class on Improv quilting next week at a retreat. This project is one of the things I will be working on at the retreat so I am hoping to come home with a finished top with the cool color blocks. I will also likely begin the next in the series with the turquoise and orange color palate.


Sunday, February 2, 2014

Improv II Top Pieced

I finally found time today to get the Improv II top pieced. It is a very rustic piece and will hang as art. This piece was a real learning curve as I have never tried this method before in quite this way. The final quilting and the cropping of the quilted piece will change it a bit but for the most part the feel of the piece will remain.

Now I need to get off the computer and get to some cleaning and cooking so I can be ready for the superbowl later this afternoon.

Next week I will go thru my fabric selections and do another edit for the Improv III piece. I am still trying to come up with the final colors. I am torn between lots of solids in brights vs a mix of solids and prints in the cool colors. Once I figure it out I will be cutting 18 inch squares of 9 fabrics and then will be ready to get cutting and sewing. The Improv III will be totally different from I or II and I think I will end up liking it the most of the three but then until they are quilted, embellished (those that I decide need it) and bound I will not really be sure which will be best. They are all very different and the techniques. Nope..........no hints about Improv III yet!