Wednesday, September 19, 2018

Nesting Robin Focus Quilt


This quilt began as a nesting robin back in 2014. A nesting robin is a way to do a quilt in rounds without sending it to a group where each member adds a round to the quilt. The finished top spent some time on the pile of finished tops and I finally quilted it in January of 2018, and added the border in the Summer of 2018.
I am really happy with the fun little quilt as I used a variety of different techniques and really pushed the box for creating a "round robin".


When It came time for the final binding I decided to go very scrappy and just loved the final look in the photo above with the bits of color popping around the edge of the quit.


The first prompt for the project was to use an orphan block but instead I chose a word and instead used leftover fabric (an old thrifted navy sheet ..............I loved the way it was faded and soft). I like the idea of using the word focus because what we focus on is what we do and how we live.

My word block all trimmed up.


The second prompt was to use squares and/or rectangles so I went with an easy scrappy frame in purple to go with the green. My favorite color combo is the cool colors. This little frame ended up being the inspiration for the final scrappy binding.

The third prompt was use triangles and I love flying geese. Since they were small they were paper pieced. I actually enjoy this technique for the dead on accuracy it gives and you sew right on tip of the lines which gives a perfect shape every time as long as you take care. This is my paper piecing technique I use when I want if perfect.

The geese being sewn.


I loved the look of the asymmetric geese. The plaid fabric is something I picked up at a retreat. It was on the give away scraps and it was a cheap poly............but it was dead on perfect for the look I wanted so I used it.

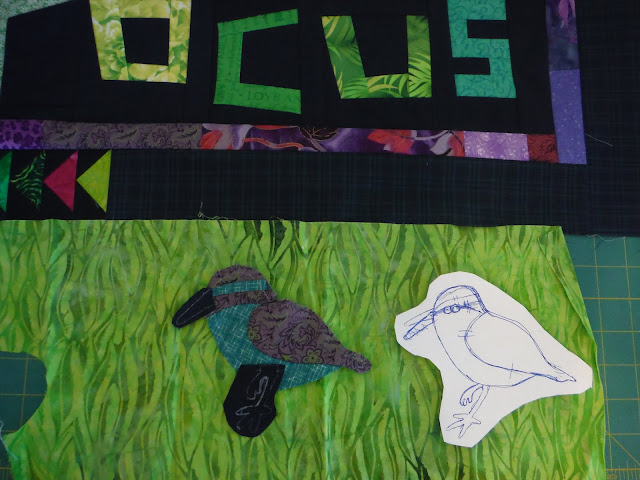
The fourth prompt was flora and fauna. Since I love birds I decided to make a bird. This is the point in the project that I decided not to keep going around the center with borders so I made this as a free standing block. I loved the background fabric above but it did not work well with the focus block so I chose the green below which kinda looks like foliage.

Here is the little bird next to the drawing I used to make him.


Here is an example of how I placed the applique and worked my way around. I love needle turn applique and this was a real challenge.


The color in the photo is not so good but you can see the size of the feet compared to that penny. Yep this really was a total challenge to make the feet so tiny. I just cut away a little of the background as I went which enabled me to keep the shape from stretching.

Here is the finished bird with the first block.


The fifth prompt was to use curves. Again I pushed the envelope and decided that mountains have curves and so flowers so I made a little mountain meadow landscape. This kinda reminded me of the mountain meadows I saw on my backpacking trip in Colorado earlier in the Summer. This technique was inspired by the techniques of Ruth McDowell. The mountains are all machine pieced together and there is no applique in that part.


But wait, now comes the applique as the meadow needed a flower. This was another insane needle turn project. The flower is pretty small and those peddles were again a challenge.


I decided to stuff the brown part of the flower to make it stand out a bit more.


The sixth prompt was "if it has a name it's fair game". I decided to make a group of pinwheel blocks. Those are all separate blocks.


The seventh prompt was to repeat and element. Humm those geese around the focus block were pretty nice so I made more but made these even smaller. The finish about and inch wide all the way around. Teeny tiny paper piecing.............this is where that paper piecing technique I like to use really shines because they are so precise.


So here are all the elements complete waiting for the final layout.
The final top. This took lots of time to figure out how to arrange all the pieces. This top sat untouched for about three years. Because I quilt for other people it was loaded and unloaded from my longarm three times before I was able to finally start the quilting. I am glad that I did wait because the quilting on this project was very detailed...........let's just say I quilted it within an inch of its life. I will do another blog post to show the quilting of this project.

Please leave me a comment and tell me what you think of this project.

Saturday, August 25, 2018

Mystery Quilt From 2018 Arizona Retreat

This is my stretched chains mystery quilt finally completed. Ellen taught this as a mystery at the retreat in Phoenix this past February. I was on the fence but came up with the perfect color scheme. My friend Misha and I shared Faris as we needed about 70 strips WOF to make the quilt. We each cut 2 strips of 40 unique fabrics and shared so we each ended up with 70 something fabrics. The colors were blue and green with a little purple. My background color was a cream and Misha did black.

Here is the photo I used to tempt Misha and she lover the idea.

Some of the ladies had finished tops at the end of the retreat but I was not one of those.  I took a few extra months to put mine together.

Here it is on the home streach with the chains laid out.

My friend Mel did one in cool colors with 30's fabrics. She finished her top at the retreat and sent it home with me to quilt. I decided it needed feathers.


I finally got my top done and loved the feathers on Mel's and decided to fo them on my quilt.


Here is a photo of both quilts. The design is not the same.

This is the one I quilted for Misha. She did a different layout on hers which was stars. It is a beautiful design.

A closeup of one of Misha's stars.

Here is my finished quilt. I had a fun day on the beach doing a photoshoot of two quilts and a couple of totebags. Stay tuned for the othe quilt in a upcoming post. The bags are the post before this one.

Friday, August 3, 2018

Vintage UFO


There are many reasons why some UFOS never get finished. Take for example this lovely pile of 24 vintage blocks. They were gifted to me years ago by a quilting friend. I am not sure where she got them but she decided she was not inspired enough to do anything with them. Since my first love of quilting was antique and vintage quilts I gladly accepted them. Every few years I would pull them out look at them and put them away again.

They were most likely pieced using scraps from garment making. There are 40's, 50's and maybe some 60's fabrics. Possibly some might even be newer. The background muslin is thin. The blocks are machine pieced except for one. The one hand pieced is more precise and has a black circle appliquéd to the center. This makes me wonder if this was the first block and the project got put away for some time or a second person got it. The fabrics are the same so it was likely from the same scrap collection.

The problem is that the machine piecing is not well crafted. The seams are from a quarter to an eighth of an inch. Points are lopped off and the edges are as much as a quarter inch off.

I have often thought I could remake this project and have shown it to a few friends who think I am nuts. I threw these blocks in with the stuff I took in the RV with me a year ago and figured if I was ever in need of something to fill the time I could do something with them.

Well such a day finally came. We are going tent camping for the weekend and I had no handwork project to grab. I saw these and realized that the only prep required was a couple bags and Jack my trusty seam ripper was all  I needed. Ok......here goes nothing. Step one pick them apart. I'll let you know how that goes.


You can see the yellow point comes all the way to the edge of the next piece.....no that will no do!


Monday, July 30, 2018

It All Started With A Crazy Idea


 These bags started as a crazy, "What if" idea. I had some legs I had cut off some jeans because I wanted some Jean shorts and an old pair of jeans my hubby didn't want any more. Hummm....Wonder if I could quilt them and make bags. I was getting tired of the tedious quilting on my UFO and wanted a distraction. I also wanted a birthday gift for a friend.


After the first bag I was really excited....this is awesome!


So here are the deconstructed Jean legs laid out on the frame. I used white extra wide muslin on the back and Hobbs 80/20 batting. I just laid them out in a row.

OK now what. I started with the flowers and went from there. Ok also some feathers would be nice. I used Signature Cotton longarm thread in a variety of colors. For the design I went over each line over and over.....more like embroidery than quilting. For the background areas I just used black and did a meander stipple and straight lines. This part was just to flatten the background so the design would pop more.

In progress and I was having fun.


Even the back looked pretty cool.


Wednesday, May 30, 2018

Well Aged UFO


It is hard to believe that this UFO is almost 12 years old! I started it sometime in 2006 with block swaps for the log cabin blocks. After putting them together I decided to do a applique border around them and that took about a year. Then I loaded it on the longarm and did a stitch in the ditch around the top border applique and bottom border applique as well as the light parts of the log and some of the green inner border. I had to take it off the machine to work on customer quilts and it never got any further than that. Well I was looking thru my UFOs and since this one was already partly quilted I decided that I should work on this one next. There will be no deadline on this I will just keep at it till it is done. Since the blocks were from a swap the piecing is not good enough for a high end show quilt but I will still do some fancy quilting as practice and maybe enter it in some smaller shows. I just want to have fun with it.

 These are the flowers that are part of the applique around the outside border. I worked on these for quite some time.

 Flower buds for the applique. I like these a lot, even better than the flowers.

 I  love the bear and the bunnies. I think they are my most favorite part of the border.


This is the quilt without the applique. I am looking forward to having this a finished quilt in the near future as this one has aged plenty long enough.